Introducing Mr.Worldwide
Published Sun Jan 20 2019
To help with a little investigation of mine regarding international languages support in eDEX-UI, I wanted to analyze a font file to see how many alphabets and languages it could support.
After a bit of ducking around, I couldn't find an online tool that did this properly, so I built my own: Mr. Worldwide.
Mr.Worldwide analyzes the writing systems supported by a font (support of specific unicode ranges corresponding to regional languages) and displays the results in a way that is easy to understand at a glance - a colored world map.
The name is of course a reference to the 2011 meme - I take great pride in gaving any piece of software I build the shittiest name possible*. The tool itself is only one, sort-of-lengthy, browser-side javascript file that uses a lot of bleeding edge web APIs like FontFaceSet for dynamically loading fonts in the webpage.
The overall look of the interface is shamelessly stolen inspired from Zeit.co's datacenter ping tests - I'm a real fan of their modern, high contrast designs on their websites and panels, and wanted to try and borrow a bit from that. Which turned out to not just be "a bit" but whatever, at least it doesn't look (too) ugly.
Let's dive into the code, shall we?
#01: Loading a custom font from a file, with drag & drop for the wow factor
The first step in the tool's workflow is to get a web font file from the user and load it up into the browser so it can be tested.
I wanted to make an intuitive, drag & drop experience - something I never actually looked into before - and it turned out to be really easy to implement, considering this tool only targets ultra-modern browsers so I didn't have to worry too much about compatibility.
First, we use the drag&drop HTML API and specifically the DataTransfer property of the drop event to get a file from the user.
function initApp() {
    var dropper = document.getElementById("dragdrop");
    var icon = document.getElementById("dragdrop-icon");

    dropper.ondragover = e => {
        e.preventDefault();
    };
    dropper.ondrop = e => {
        e.preventDefault();

        dropper.ondrop = null;

        var dt = e.dataTransfer;
        if (dt.files.length !== 1) {
            icon.setAttribute("src", "assets/no.svg");
            setTimeout(initApp, 1000);
        } else {
            // We have the file in dt.files[0]
        }
    };
}
The preventDefault()s on dragover & drop are needed to ensure that those events won't be handled by the browser, which would open the file in a new tab. If more than one file is dropped, a "denied" symbol is displayed for a second, and then the app's logic is restarted.
Now, we need to get the binary data from the file. For this, we're going to use the FileReader API, like this:
var fr = new FileReader();
fr.onerror = () => {
    // Read failed, restart.
    icon.setAttribute("src", "assets/no.svg");
    setTimeout(initApp, 1000);
};

fr.onload = e => {
    var buffer = e.target.result;
    /* buffer is an ArrayBuffer with the binary
     data from the dropped file. */
};

// We got our handlers in place; start reading.
fr.readAsArrayBuffer(dt.files[0]);
Reading the file as an ArrayBuffer allows us to feed it to the (experimental) FontFace API, which allows us to programmatically create new fonts and load them into the webpage - it's the same thing as defining a @font-face rule in CSS, but from Javascript.
var buffer = e.target.result;
window.testFont = new FontFace("testFont", buffer);
Creating a new FontFace object never raises an error with the current spec/implementations, but that doesn't mean it worked all right: we didn't do any input check, so we're not even sure that the file provided is indeed a loadable web font.
Thankfully, FontFace objects have a status property - it can take the values "unloaded", "loading", "loaded", or "error" (at time of writing, keep in mind this is not a fully stable API yet). By checking for FontFace.status === "error", we can use the FontFace constructor as an input validator, like so:
window.testFont = new FontFace("testFont", buffer);
if (window.testFont.status === "error") {
    // Bad font file or unsupported format, restart.
    icon.setAttribute("src", "assets/no.svg");
    setTimeout(initApp, 1000);
} else {
    // window.testFont is valid and ready to be loaded.
}
Now that we're sure everything is all right, we can load the font using the FontFaceSet API. The document-wide FontFaceSet can be accessed with document.fonts.
// window.testFont is valid and ready to be loaded.
document.fonts.add(window.testFont);

/* FontFaceSet.load() requires a font size, but it is arbitrary at
the moment, the "12px" value doesn't have any importance. */
document.fonts.load("12px testFont");
And voilà! The dropped file has been validated and loaded into the document's font set. We can use it in CSS as testFont.
#02: Getting the required data for the tests

Geographic distribution of the most used writing systems, source: wikipedia
Before actually testing anything, I first needed data on which writing systems were used in the world, where were they used, and the range of Unicode characters needed for each one of them. I couldn't find a compiled list that referenced the unicode ranges needed to write in modern scripts by family, so I spent a few hours making my own by looking at the map above and lists of Unicode blocks used by each major writing system, like this one for the Latin scripts.
The end result is JSON data listing all the character ranges needed to write modern text in each of the world's most commonly used writing systems:
{
    "latin": [
        [0, 127],
        [128, 255],
        [256, 383],
        [384, 591],
        [7680, 7935]
    ],
    "cyrillic": [
        [1024, 1279],
        [1280, 1327],
        [7467, 7544],
        [65070, 65071]
    ],
    ...others
}
Note: you may notice that currently non-displayable characters like ASCII control chars are not excluded from the lists; hopefully someday I'll take the time to filter those out.
#03: Testing the font
Back to the script. We have a font to test and the code of the characters to test it with; now how do we find out which ones are supported and which ones aren't? Well, try to write them, of course!
But there's one small problem: web browsers use a cascading fallback font system, which means that if the selected font can't display a character, the next choosen font is used, and so on until a font is found - either in the font's custom page or in the system's font set - that can display the problematic char. If absolutely no suitable font is found, a "?" symbol is displayed instead.
To prevent the browser from displaying characters not supported by our test font, Mr.Worldwide uses Adobe Blank. Blank is a special font made for testing purposes that maps every character to a blank, zero-width one. By setting it as the secondary font for our testing node, we can make sure that trying to write any non-supported character will make said node have a 0px width.
p#tester {
    font-family: testFont, Blank;
}
And here's the actual testing:
// Get an empty 'p' element to test our font.
var tester = document.getElementById("tester");

/* We linked the Blank font in our HTML, but since no text uses
it on the page, the browser may not have loaded it yet. */
document.fonts.load("12px Blank").then(() => {

    // We'll use a global object to store the results of our tests.
    window.testFontUnicodeCoverage = {};

    /* window.scripts is the object containing the JSON data
    listing unicode ranges by scripts (writing systems), the
    following code allows us to loop through each script. */
    Object.keys(window.scripts).forEach(scriptName => {

        // Will store the number of succesfully rendered glyphs.
        let success = 0;
        // Will store the total number of glyphs for this script.
        let divisor = 0;

        // Loop through each unicode range used in this script:
        window.scripts[scriptName].forEach(range => {

            /* Add the total number of glyphs in this range
            to our divisor. */
            divisor = divisor + (range[1] - range[0]);

            // Loop through each individual unicode character:
            for (let i = range[0]; i <= range[1]; i++) {

                // Write the character to our test node.
                tester.textContent = String.fromCodePoint(i);

                /* If a character is rendered, increment the
                number of successfully rendered glyphs. */
                if (tester.offsetWidth > 0) {
                    success++;
                }
             }
        });

        /* Calculate & store a float representing the percentage
        of this writing system that is supported by our
        test font. */
        let successRate = success / divisor;
        window.testFontUnicodeCoverage[s] = successRate;
    });
});
You might be interested in learning more about Object.keys, which is used to loop through the values of an object, and String.fromCodePoint, which allows creating a string from unicode character codes in hexa- or decimal format.
The test results are stored in a global object window.testFontUnicodeCoverage that gives the percentage of script support for each writing system, like so:
{
    "arabic": 0.17299820954677847,
    "armenian": 0,
    "brahmic": 0,
    "canadianSyllabic": 0,
    "cjk": 0,
    "cyrillic": 0.5146058024865757,
    "ethiopic": 0,
    "gana+kana": 0,
    "georgian": 0,
    "greek": 0.7601562335069727,
    "hangul": 0,
    "hebrew": 0.8966550340600317,
    "latin": 0.9126691936883361,
    "thaana": 0.17299820954677847
}
#03: Displaying results
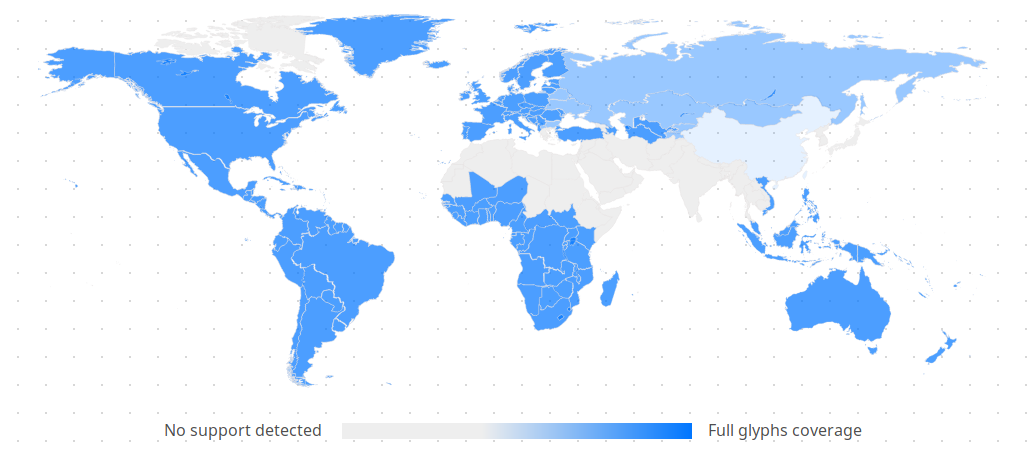
To display the results on a world map, I made an svg element representing a world map with countries outlined and class attributes on each country with the name of the most used writing system there.
The JS script can then apply the right colors simply by appending a style element with calculated opacity values:
let style = document.createElement("style");
style.innerHTML = `
    .latin {
        fill: #0076ff;
        fill-opacity: ${window.testFontUnicodeCoverage.latin};
    }
    (...)
`;

document.body.appendChild(style);
The color scale at the bottom was made simply with a CSS linear-gradient background in a span element.
And that's it! You can test the tool or look at the code on GitHub.
Thanks for reading and hope you enjoyed this. I'm looking forward to publish more tech write-ups like this, notably about eDEX-UI, since I got a few requests for that one.